Disable “show notifications” prompts in Google Chrome
Websites may use a technology called Push API to display prompts to the user on visits to allow them to push notifications to the browser.
The new technology is on the rise thanks to the recent integration in browsers such as Firefox or Google Chrome.
Firefox users? Check out our detailed Firefox Push Notifications guide here.
There are two sides to it. It can be quite useful on the one hand, for instance by informing you about new articles published on a blog, new email in your account, or when items on your wishlist are available for sale.
On the other hand, it may be abused easily as well. Sites may display (text advertisement) in those notifications, or simply spam you.
While you need to permit sites to use Push Notifications, you will usually find out how they are using these after you give them permissions.
Google Chrome "Show Notifications"
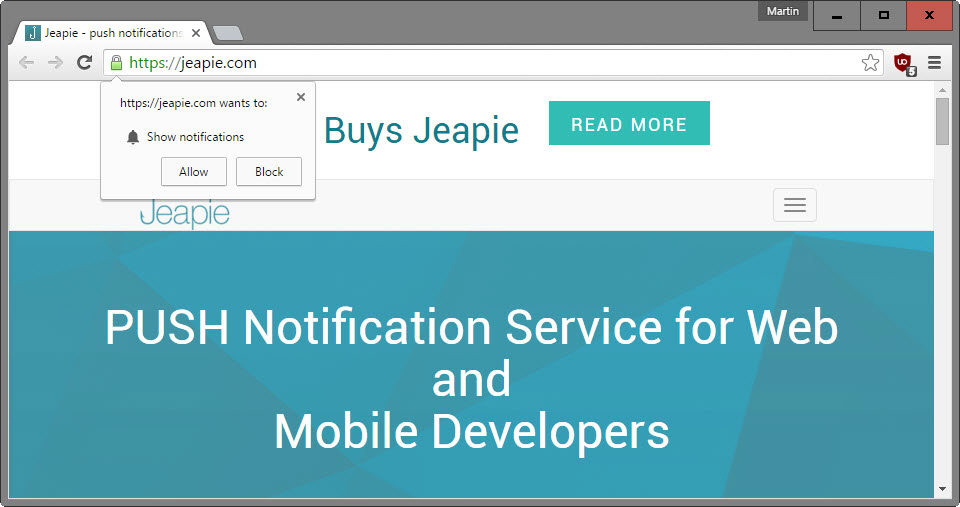
When you visit a website in Google Chrome that supports these notifications, a prompt is displayed automatically.
The prompt displays the hostname of the site at the top, and below that it wants to "show notifications". You may allow or block the request using buttons, or close the prompt using the x-icon in the top.
- Allow gives the site permission to push notifications to the browser, even if the site itself is not open.
- Block denies the permission. It ensures that the site won't display notification prompts anymore when you open it.
- Close postpones the decision. Prompts are displayed again on your next visit to the site.
How to turn off notifications in Google Chrome
You can block the notification feature completely in the Google Chrome browser if you have no use for it.
- Click on the menu icon in the top right corner of the screen, and select Settings from the context menu that opens. Or, load chrome://settings/ directly in the browser's address bar.
- Scroll down until you find "show advanced settings" listed on the page, and click on the link.
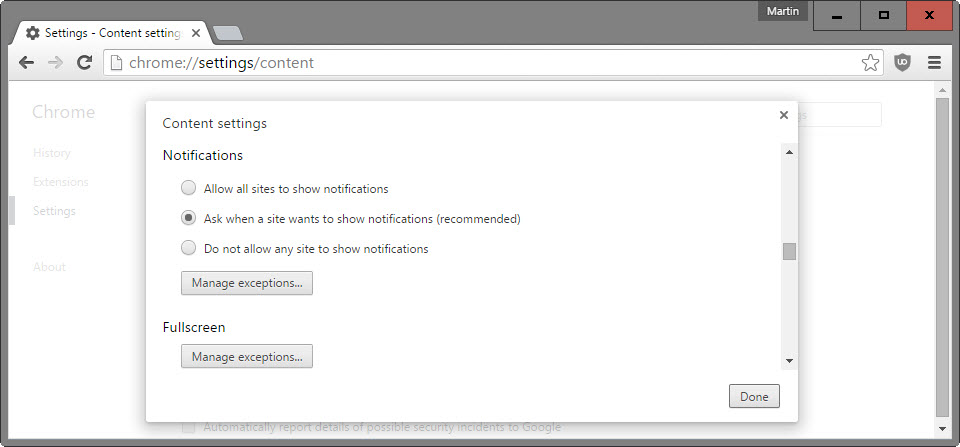
- Locate the "content settings" button under Privacy, and click on it.
- Scroll down until you find the Notifications listing.
- Switch the preference to "do not allow any site to show notifications" to block all notifications.
- The default setting is "ask when a site wants to show notifications", and the only other option is to allow notifications automatically by selecting "allow all sites to show notifications".
Use the whitelist/blacklist for specific sites
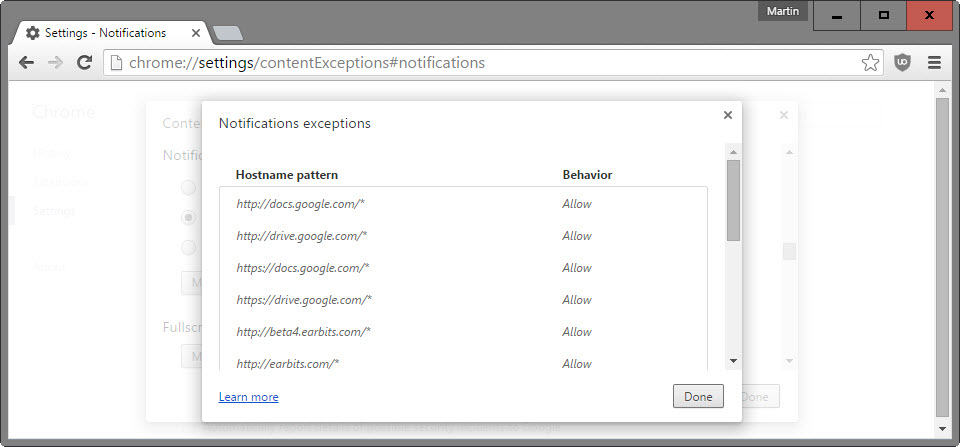
The whitelist/blacklist feature is useful if you have selected to allow or block all notifications in Chrome using the content setting described above.
Tip: You can open the exceptions list by loading the url chrome://settings/contentExceptions#notifications in the browser
If you have set it to allow, you can blacklist (read block) sites using the exceptions list, and if you have set the feature to block all notifications prompt, you may whitelist (read allow) select sites to display notifications despite that.
Click on the "manage exceptions" button underneath the notifications options. Please note that some sites may have been added there by Google, and that you cannot remove those sites from the listing. These are displayed in italics, and there seems to be no way to remove them.
To add a site simply enter its hostname, e.g. https://example.com/ and select the allow or block permission.
If you want to add exceptions for an entire domain, add [*.] in front of the domain name.
Useful resources to research the topic further
Google Support on managing exceptions
Google Support on allowing or blocking notifications, hiding the notification icon (Chromebook only), and turning off notifications from some sites (Android and Chromebook only).
You may remove permissions that you have set at any time using the menu.
This article was first seen on ComTek's "TekBits" Technology News

- Log in to post comments