How to disable Fast User Switching on Windows
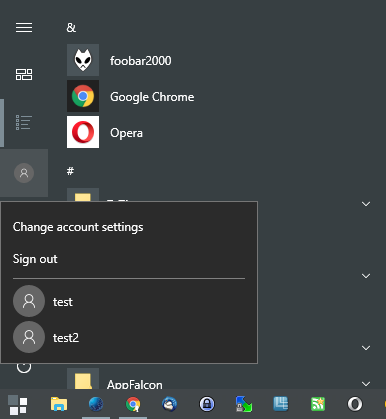
Fast User Switching is a Windows feature that allows users to sign in to accounts while others are still signed in on the machine. Basically, what it does is allow multiple users to work with the Windows computer at the same time.
Microsoft introduces the functionality in Windows XP, and it is also support by all newer versions of Windows including Windows Vista, Windows 7, Windows 8.x and Windows 10.
While Fast User Switching may be useful in some scenarios, it may introduce issues of its own. The feature puts more strain on the computer and its resources, as multiple users instead of just one user run programs on it.
What's probably more problematic in many cases is that changing the Windows PCs power state may impact other accounts that are logged in at the time.
Disable Fast User Switching on Windows
If you disable Fast User Switching, options in the user interface of the operating system are removed to use the feature. The effect that this has on the machine is that only one user may use the machine at the same time. This means that users need to log out before another user may log in.
You have two options for that. If you run a professional or Enterprise version of Windows, you may use the Windows Registry or Group Policy to disable the feature. Home users need to make the change to the Registry as the Group Policy is not available on their machines.
Here is a video that demonstrates Fast User Switching on a Windows 7 machine
Disable Fast User Switching using the Group Policy
As mentioned earlier, the Group Policy is only part of professional and Enterprise versions. If you run a Home edition, e.g. Windows 10 Home, skip this part and go directly to the Disable Fast User Switching using the Registry section below.
Start the Group Policy Editor on the Windows machine in the following way:
- Tap on the Windows-key, type gpedit.msc, and hit the Enter-key afterwards.
Use the hierarchy on the left to navigate to the following policy folder: Local Computer Policy > Computer Configuration > Administrative Templates > System > Logon.
You find the policy Hide entry points for Fast User Switching there as one of the listed policies. If you have troubles locating it, click on the Setting table header to sort the policy listing alphabetically.
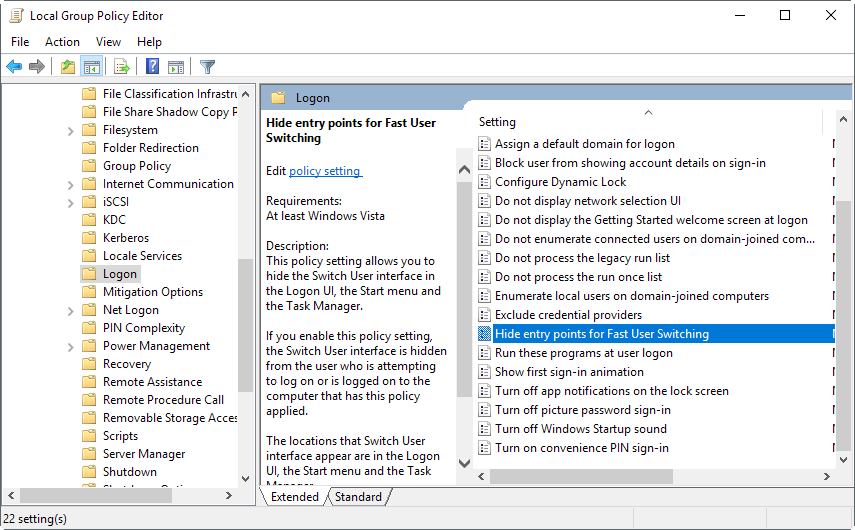
Once you have located the entry, double-click on it to open its configuration options. The policy is not configured by default, and you may set it to enable or disabled using the editor. Please note that it applies to Windows Vista or later versions of Windows only.
If you want to disable Fast User Switching on the Windows machine, switch the setting to enabled, and hit the ok button afterwards.
You can undo the change at any time by setting it to disabled, or not configured (which also means disabled).

In short, enabled means that you enable the policy to hide the Fast User Switching options in the Windows interface, disabled means that the policy is not active (and that Fast User Switching options are visible).
This policy setting allows you to hide the Switch User interface in the Logon UI, the Start menu and the Task Manager.
If you enable this policy setting, the Switch User interface is hidden from the user who is attempting to log on or is logged on to the computer that has this policy applied.
The locations that Switch User interface appear are in the Logon UI, the Start menu and the Task Manager.
If you disable or do not configure this policy setting, the Switch User interface is accessible to the user in the three locations.
Note that the change does not affect users who are signed in at the time. These need to sign out, or be signed out if that is the only option, before the feature cannot be used anymore.
Disable Fast User Switching using the Registry
The change in the Registry has the same effect as the policy. You need to start by loading the Windows Registry Editor:
- Tap on the Windows-key, type regedit.exe and hit the Enter-key.
- Confirm the UAC prompt if it is displayed.
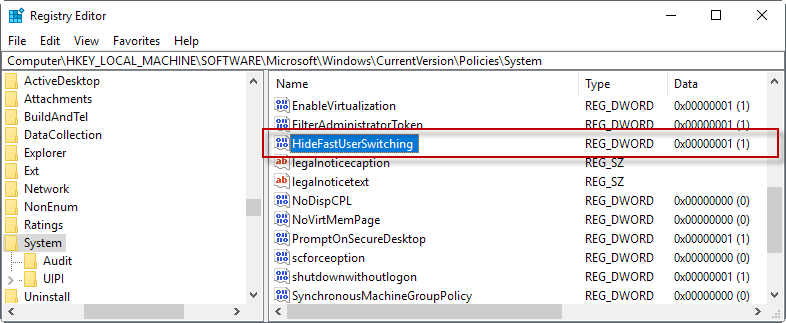
Use the folder hierarchy on the left to navigate to the following key: HKEY_LOCAL_MACHINE\SOFTWARE\Microsoft\Windows\CurrentVersion\Policies\System
Look on the right to see if HideFastUserSwitching is already there. If it is not, right-click on System on the left sidebar, and select New > Dword (32-bit) Value. Name the new value HideFastUserSwitching, double-click on it afterwards, and set its value to 1.
Note that you need to restart the PC, or sign out and on again, before the changes takes effect.
I have created two Registry files that you may run. The first sets the key to enable, the second to disable. You may run those to make the necessary changes to disable or enable Fast User Switching on the Windows machine.
Download the small file with a click on the following link: fast-user-switching.zip from ghacks.net.
You need to accept the UAC prompt when you run the Registry script. Windows may display a warning that you need to accept as well before the script is applied.
This article was first seen on ComTek's "TekBits" Technology News

- Log in to post comments