How to check Hard Drive Disk Health in GNU/Linux
So, I recently purchased a new (used, but new to me) laptop, that had a 1TB 5400RPM Hard Disk in it, granted the laptop is fairly powerful and capable of modern gaming, rendering, and number crunching thanks to a 4th generation i7 CPU and a Dedicated 2GB GDDR5 GPU. However, the HDD seemed to be running awfully slowly, even for a 5400RPM drive.
I’ve been using strictly Solid State Drives for a number of years now, so I admit there was always the possibility of me just having become spoiled, but I thought that perhaps I should look into the health of the drive; after all, a laptop with specs like that should in my eyes run faster so better safe than sorry. This raised the thought to me that perhaps I should write a quick how-to on this procedure for the Ghacks.net community.
This tutorial is done via CLI only, however, there are tools that do the job as well I will briefly cover at the end of this.
Checking the hard drive health in Linux
The tool we are going to be using is called smartmontools (which is also available for Windows and OS X).
The smartmontools package contains two utility programs (smartctl and smartd) to control and monitor storage systems using the Self-Monitoring, Analysis and Reporting Technology System (SMART) built into most modern ATA/SATA, SCSI/SAS and NVMe disks. In many cases, these utilities will provide advanced warning of disk degradation and failure. Smartmontools was originally derived from the Linux smartsuite package and actually supports ATA/ATAPI/SATA-3 to -8 disks and SCSI disks and tape devices.
Installing smartmontools
- For Ubuntu/Linux Mint users: sudo apt install smartmontools
- For Arch users: sudo pacman -S smartmontools
Generally speaking smartmontools is available on most distributions, just install with your given package manager using the package name “smartmontools”
The How-To
Once that is installed, we need to figure out which drive our questionable one is:
sudo fdisk -l
This will give you a list of all drives and partitions. If you are only using one drive within your machine then it’s going to list /dev/sda and its various partitions. If you have multiple drives, you’ll need to use a little bit of common sense in seeing which drive the one you want to inspect, has what on it, and it’s associated listing such as /dev/sdb or /dev/sdc etc.
Once we know the drive we want to check out, there are three tests that we can run, depending on how concerned you are:
- A short test, usually sufficient at detecting issues
- A longer test if you are more concerned that examines the entire disk surface
- A conveyance test which is used to test if damages occurred during transportation of the device from the manufacturer.
The next step is to find out what types of tests our disk supports, as well as an estimate to how long the tests will take to run.
sudo smartctl -c /dev/sdX (replace X with the appropriate letter)
You're going to be given a large amount of output as seen in this screenshot. I've highlighted the areas that were relevant to me for this test; the time estimates, and the fact that my disk does NOT support a conveyance test.
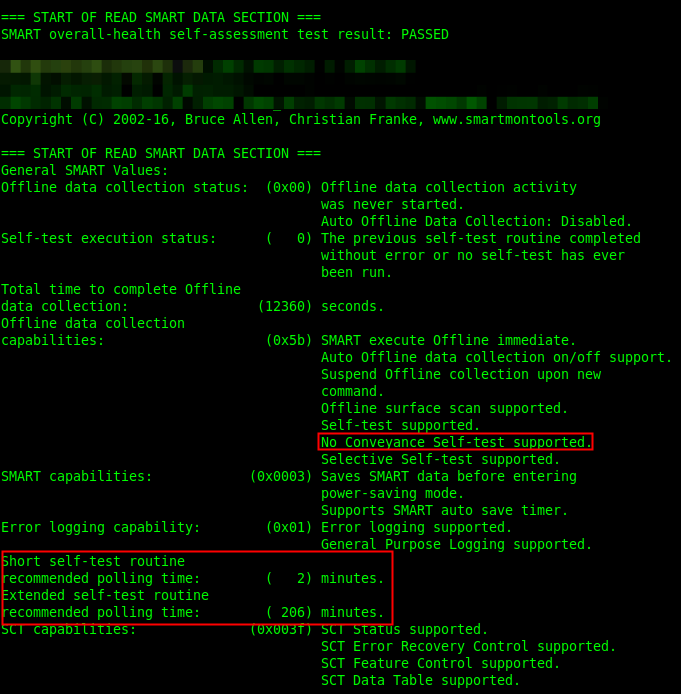
I oped to run the shorter test, just because I heard no clicks or other telltale signs that the hard disk was actually on it’s last legs besides the speed; to which I again state I may just be spoiled by SSDs. You are more than welcome to run that which you feel needed.

The commands for the various tests are (replace sdX with the drive that you want to test)
- Short: sudo smartctl -t short /dev/sdX
- Long: sudo smartctl -t long /dev/sdX
- Conveyance: sudo smartctl -t conveyance /dev/sdX
Note: You will not get any scrolling output for your test beyond being told how long the test will take. If you're running the long test, you may have to wait an hour or two or longer.
Once the test is finished, it's time to get out result!
sudo smartctl -H /dev/sdX
Hopefully you'll see this:
![]()
If not, then either some more digging may need to be done, or it might just be time to replace the drive in question.
GUI Tools
There are other options for those of you who avoid the command line, such as the very popular and well known tool gnome-disk-utility (also known as 'disks' by some desktop environments.)
There are numerous other free and paid utilities out there, but I'm not here to advertise, as both of these utilities have served me well in the past for doing quick checks.
Good Luck!
This article was first seen on ComTek's "TekBits" Technology News
- Log in to post comments