How to disable automatic maintenance tasks in Windows 8
If you are running the Windows 8 operating system, and it does not really matter if you are still on Windows 8 or have upgraded to Windows 8.1, then you may have noticed that the system starts to run maintenance jobs all of a sudden.
While some of those tasks are defined to execute only when the system is idle and not in use, you may still notice that the tasks are run regardless of that.
So, if you are playing a multiplayer game, watching HD movies or running other tasks that require a lot of processing power and system resources, you may have noticed that things slow down during that time.
While that won't happen if you use a high-end machine, it may very well be an issue on low to mid-end systems.
Another thing to consider is that Windows will wake the computer to run the regular maintenance task on the system.
How scheduled maintenance works
Automatic Maintenance has been designed to address several issues of maintenance related tasks that users experienced on previous versions of Windows.
The goal of the feature is to combine all maintenance related tasks such as checking for Windows and software updates, running defrag or performing antivirus scans and including those by Windows and third-party developers to run them without impacting the performance or energy efficiency of the PC.
Windows schedules the automatic maintenance to run at 3AM or 2AM every day by default. The daily limit is set to 1 hour which means that it will run no longer than that per day.
It will also only run if the computer is idle, and stop maintenance tasks when the use returns and starts using the PC again.
Maintenance tasks are resumed when the PC is idle again with an important change. Tasks marked as critical will be run regardless of user action or load.
Additional information about Automatic Maintenance tasks are available on MSDN.
Disable maintenance tasks
Disabling the maintenance tasks may resolve those issues for you. It is suggested to disable the tasks to see if this is indeed the case. If it is not and the issues that you are experiencing are caused by something else, then you may want to consider enabling the tasks again.
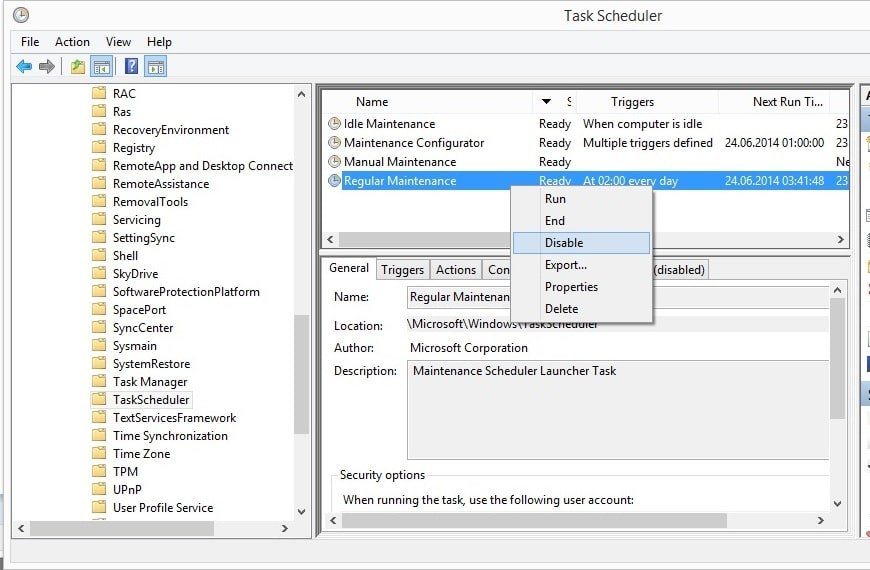
Right-click on Regular Maintenance and select disable from the context menu. This turns this task off so that it won't be run anymore.You can perform the same operation on the Idle Maintenance task as well, even though that should not really be necessary.
- Tap on the Windows-key to bring up the start screen interface. If you are already on it, skip this step.
- Type Task Scheduler and click on the schedule tasks result. This opens the Windows Task Scheduler.
- Browse to the following folder: Task Scheduler Library > Microsoft > Windows > TaskScheduler
- The maintenance tasks are displayed on the right.
Windows won't run the disabled tasks anymore. It is up to you to determine whether that is beneficial to the system's performance or not. If you use the system as usual, it should become obvious whether that is the case or not.
As a side effect, you may disable the wake feature that the maintenance triggers to run the task. If that is the issue that you are noticing, you can alternatively change the time the maintenance task is executed at.
It is possible to change both the time and the wake option using the Task. You do need to double-click the task in the Task Scheduler to do so.
- Switch to Triggers and select edit. Here you can change the time the task is run on the PC.
- After you have made the change and clicked ok, switch to Conditions.
- Remove the checkmark from "Wake computer to run this task" to disable that feature as well.
This article was first seen on ComTek's "TekBits" Technology News

- Log in to post comments