How to get rid of Windows 10’s Rollback option on start
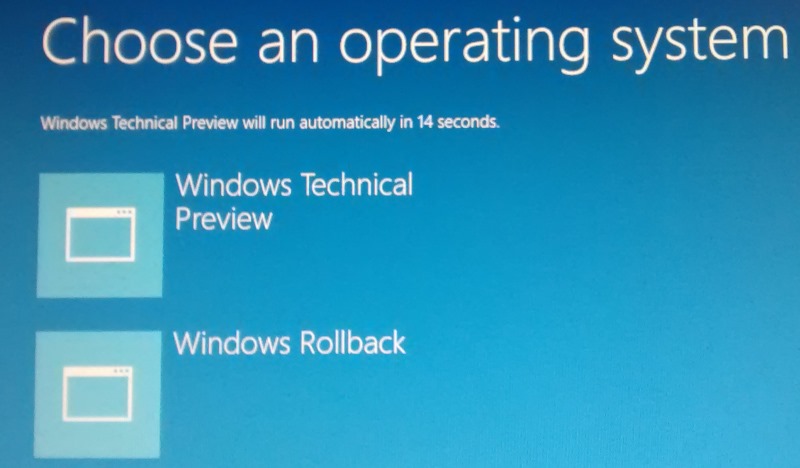
If you are running Windows 10 on a system either directly or in a virtual machine, you know that the operating system displays a selection menu on boot.
The menu displays options to boot into Windows 10 which you can do by selecting Windows Technical Preview, or to restore the initial state of Windows 10 by selecting Windows Rollback.
The menu is displayed for 30 seconds by default and Windows 10 will be loaded if no user interaction is recorded in that time.
While the rollback may have its uses in some situations, it is kinda irritating that it is displayed on every boot. If you don't require it at all or all the time, you probably want it gone to speed up the boot process of the operating system and make it more comfortable at the same time.
The following guide walks you through the steps of removing Windows Rollback from the boot menu.
You have two basic choices when it comes to that. You can either delete Windows Rollback outright, or keep it but change the time out of the boot screen to a low value so that it won't matter anymore.
The timeout
You can use msconfig to change the timeout value but it cannot go below three seconds in the menu. While that may be sufficiently fast for some, others may want a timeout that is even faster than that.
If three seconds are fine, skip to the removal part of this guide. If not, continue reading:
- Tap on the Windows-key.
- Type cmd.exe.
- Right-click on the result and select the run as administrator option. Alternatively, hold down Shift and Ctrl before you left-click on the result.
- Accept the UAC prompt if it is displayed on the screen.
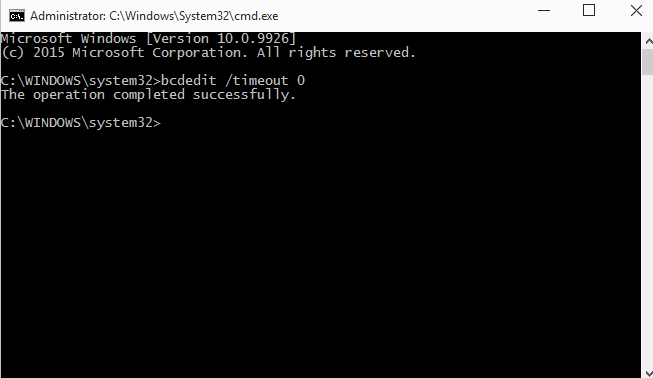
- Type bcdedit /timeout 1
The 1 is the interval in seconds that the timeout value is changed to. You can select 0 here as well or any other value.
The main advantage of this is that you can restore the default value of 30 seconds at a later point in time should you need to roll back the system then.
Removal
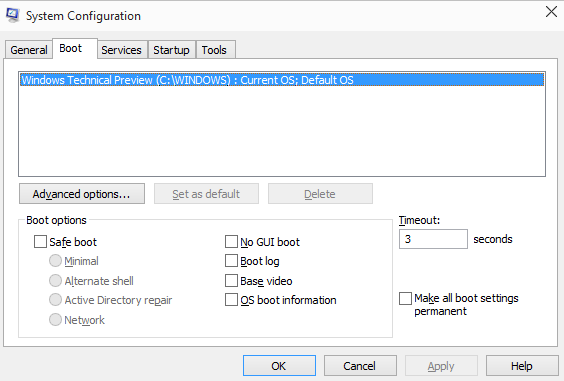
While you can use the delete command of bcdedit to remove Windows Rollback, it is easier to do so using the system configuration tool.
- Tap on the Windows-key.
- Type msconfig.exe
- Switch to boot.
- Select the Windows Rollback option from the menu.
- Click on Delete.
- Confirm and restart the PC.
The default selection is used from that moment on as there is no other option to switch to. The timeout option is better in my opinion as it allows you to use the rollback feature in the future should the need to do so arise.
It is unlikely that Microsoft will keep that option when the final version of Windows 10 is made available.
This article was first seen on ComTek's "TekBits" Technology News

- Log in to post comments