NoScript Beginner’s Guide
This NoScript Beginner's Guide has been designed to provide new Firefox or NoScript users with information on how the browser add-on works. I
NoScript is a long standing security add-on for Firefox that is rated highly on Mozilla AMO and quite popular with more than 2.3 million users.
It is often confused with ad-blockers, and while it does that to, it is much more than that and the ad-blocking is more of a side-effect of the extension's functionality than something it has been designed for.
While there is a lot more to NoScript, its main feature blocks scripts only to run on sites that you allow them to run on.
This eliminates all third-party connections of sites you visit that load active content right away for instance, as they all rely on scripts to function but it may also affect scripts running locally on the site that you have visited in Firefox.
NoScript Beginner's Guide
NoScript information can be displayed in several locations in the Firefox interface. I prefer mine to be displayed in a bottom toolbar, but the icon will be displayed by default in the main toolbar at the top.
It indicates whether resources have been blocked from being loaded by a red sign that is attached to the icon.
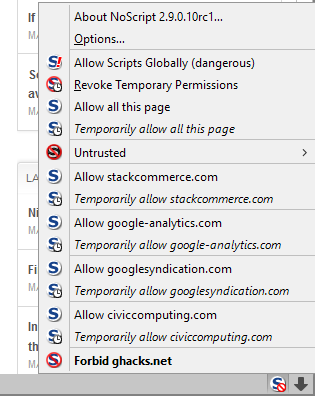
When you click on it, you see the list of sites the page you are on interacted with, and whether they are allowed to run scripts on the page or not.
Here, the red icon next to sites means that the site has been allowed to run active content which can be confusing at first.
Depending on the site in question, you may need to allow it to run active content on its own domain to work properly as you may experience issues such as broken menus, search, no downloads or other things that prevent you from interacting with it fully.
For each site listed by NoScript, you get the option to allow it temporarily or permanently.
- Allow site - whitelists the site so that it is allowed to run scripts locally or as a third-party connection.
- Temporarily allow site - whitelists the site for the session only. Close Firefox, and it will be reset to being blocked by default.
Please note that new site connections may become available once you allow sites to run scripts permanently or temporarily. For instance, if you allow googlesyndication.com, you may notice that doubleclick.com appears as a new connection after the automatic reload of the page.
The NoScript menu displays options to change permissions in bulk as well. You can allow or temporarily allow all sites on the page you are on, revoke all temporary permissions, or allow scripts globally which turns off the blocking feature for the time being until you enable it.
It is usually not a good idea to use any of those, not even for sites that don't work after changing some permissions.
The main issue that new NoScript users run into is figuring out which sites they need to allow to access a web page properly.
This can be confusing at times, especially if a site makes heavy use of content distribution networks and other third-party connections that pull libraries or other stuff that it uses to display its content to the user.
Managing the whitelist
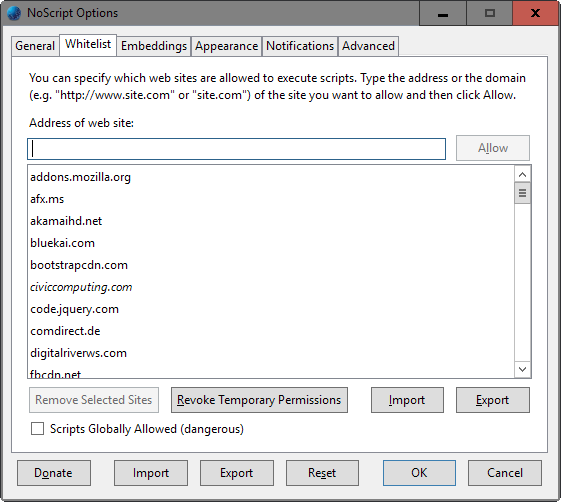
NoScript maintains a whitelist that you can manage in the options.
- Click on the NoScript icon in Firefox and select options from the menu that opens.
- Switch to the whitelist tab.
There you find listed all addresses that are allowed permanently or temporarily. The temporary sites are listed in italics for easier recognition.
Click on any address to remove the selected site from the whitelist. NoScript ships with a list of whitelisted sites, and it is suggested to go through it to remove those that you don't want whitelisted.
There you may also import and export the whitelist, which is useful if you use Firefox on more than one computer as you can distribute it to other machines this way.
Other options
The options that NoScript provides are extensive. Here are a couple that you may want to take a look at while the options window is open.
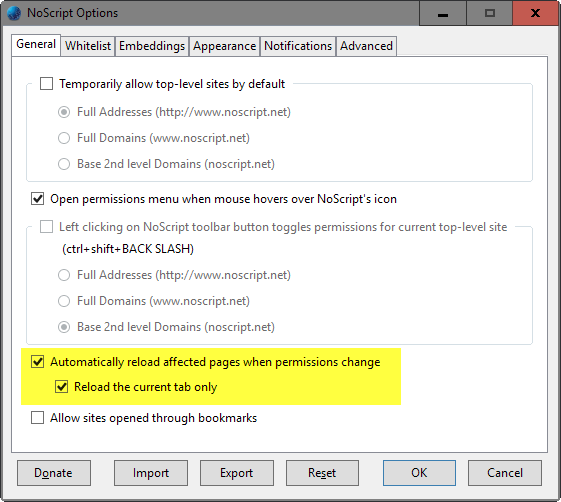
Switch to General in the options window. There you find the reload behavior of the extension. It can be configured to automatically reload all pages open in Firefox when permissions changes, or only the current tab.
Disable both to block automatic reloads.
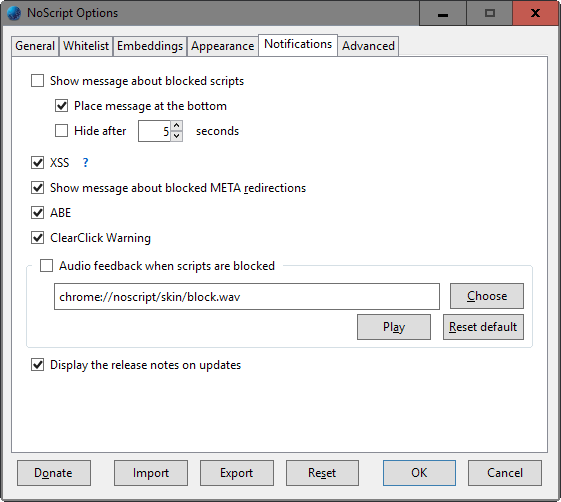
Switch to the notifications tab. There you find options to change if and how notifications about blocked scripts are displayed to you. I prefer to disable these notifications altogether as they are displayed on the screen, but you can change when, how and for how long these are displayed on the page.
The advanced page holds several interesting options as well. The untrusted and trusted tabs on the page allow you to configure additional restrictions for these site types, for instance that bookmarklets won't run on these pages.
The HTTPS tab allows you to configure sites that you want to use a secure connection all the time, or never.
It is probably a good idea though to leave these settings for the time being until you have used the extension for a while to understand its base mechanics.
Further reading
- How to use NoScript efficiently
- How to add custom site exclusions to NoScript
- NoScript Script Surrogates explained
This article was first seen on ComTek's "TekBits" Technology News

- Log in to post comments