Installing Linux Mint 18.1 Serena MATE Edition 64bit
There are many popular distributions of GNU/Linux to choose from, but it’s generally recognized among the GNU/Linux world that there are a few major players that people tend to gravitate towards more often than others.
The most common known are primarily Ubuntu, Fedora, OpenSuse, Debian, and Linux Mint. There are vast numbers of other distros that range in simplicity and user-friendliness from the it-works-out-of-the-box-like-Ubuntu: Manjaro, which is based on Arch Linux, to Arch Linux itself which is built entirely from the command line, to Gentoo which takes building your own system to an even further level than Arch.
However, today we are going to be focusing on Linux Mint version 18.1 which is code-named ‘Serena’, and my personal Desktop Environment flavour of choice ‘MATE’ which is a fork of the old Gnome2 code base that anyone who used Ubuntu a decade ago was likely familiar with.
Firstly, why Linux Mint? I love Mint, it’s not my favourite distro out of all that I have used, but it definitely is one of the most complete in terms of a working system out of the box with as little configuration needed as possible.
There is also the fact that because it’s based on Ubuntu is uses the same repositories as Ubuntu, which gives it a huge wealth of available software and package for users to download and install; a huge leap in simplicity for users who don’t wish to get into using things such as Git or building from source.
Mint is a great option for users who want to migrate away from Windows or Mac, have a fully working system with office software, music and video players, simple graphics and other hardware proprietary driver installation and more.
Linux Mint installation tutorial
In this tutorial we will cover how to do a base Linux Mint install using the entire hard drive without setting up dual boot by removing windows entirely, as well as how to install any proprietary drivers if you would prefer them over the open source drivers as well as update all packages to the latest versions available in the default repositories so that we have a fully functional and ready to use system.
The things we are going to need for this tutorial are:
-
A blank USB Flash Drive of at least 4gb (Larger if you plan to use the USB Drive for running the Linux Mint live USB for more than just installing, in that case go to 8+GB)
-
Any computer running Windows 7, 8.1, or 10
-
A Hard Drive of at LEAST 20GB in size that you plan to use entirely for Linux Mint
-
An active internet connection
-
One hour of time
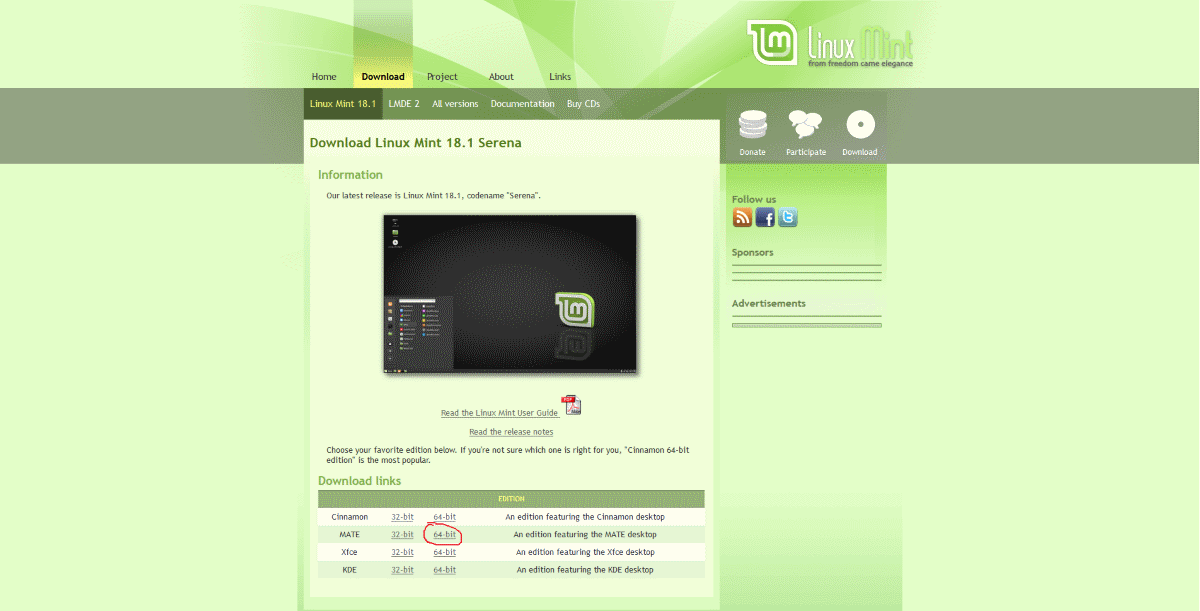
The first thing you’re going to want to do is head over to http://LinuxMint.org and hover over ‘Download’ and then select ‘Linux Mint 18.1’ which will take you to the download page, from there select ‘64-bit’ from the MATE downloads listed, if your system is 64bit (Most are. If you’re running a machine that is Pentium 4 or newer, you are likely 64bit, so if you didn’t have to blow the dust off your machine first and check for cobwebs, select 64bit)
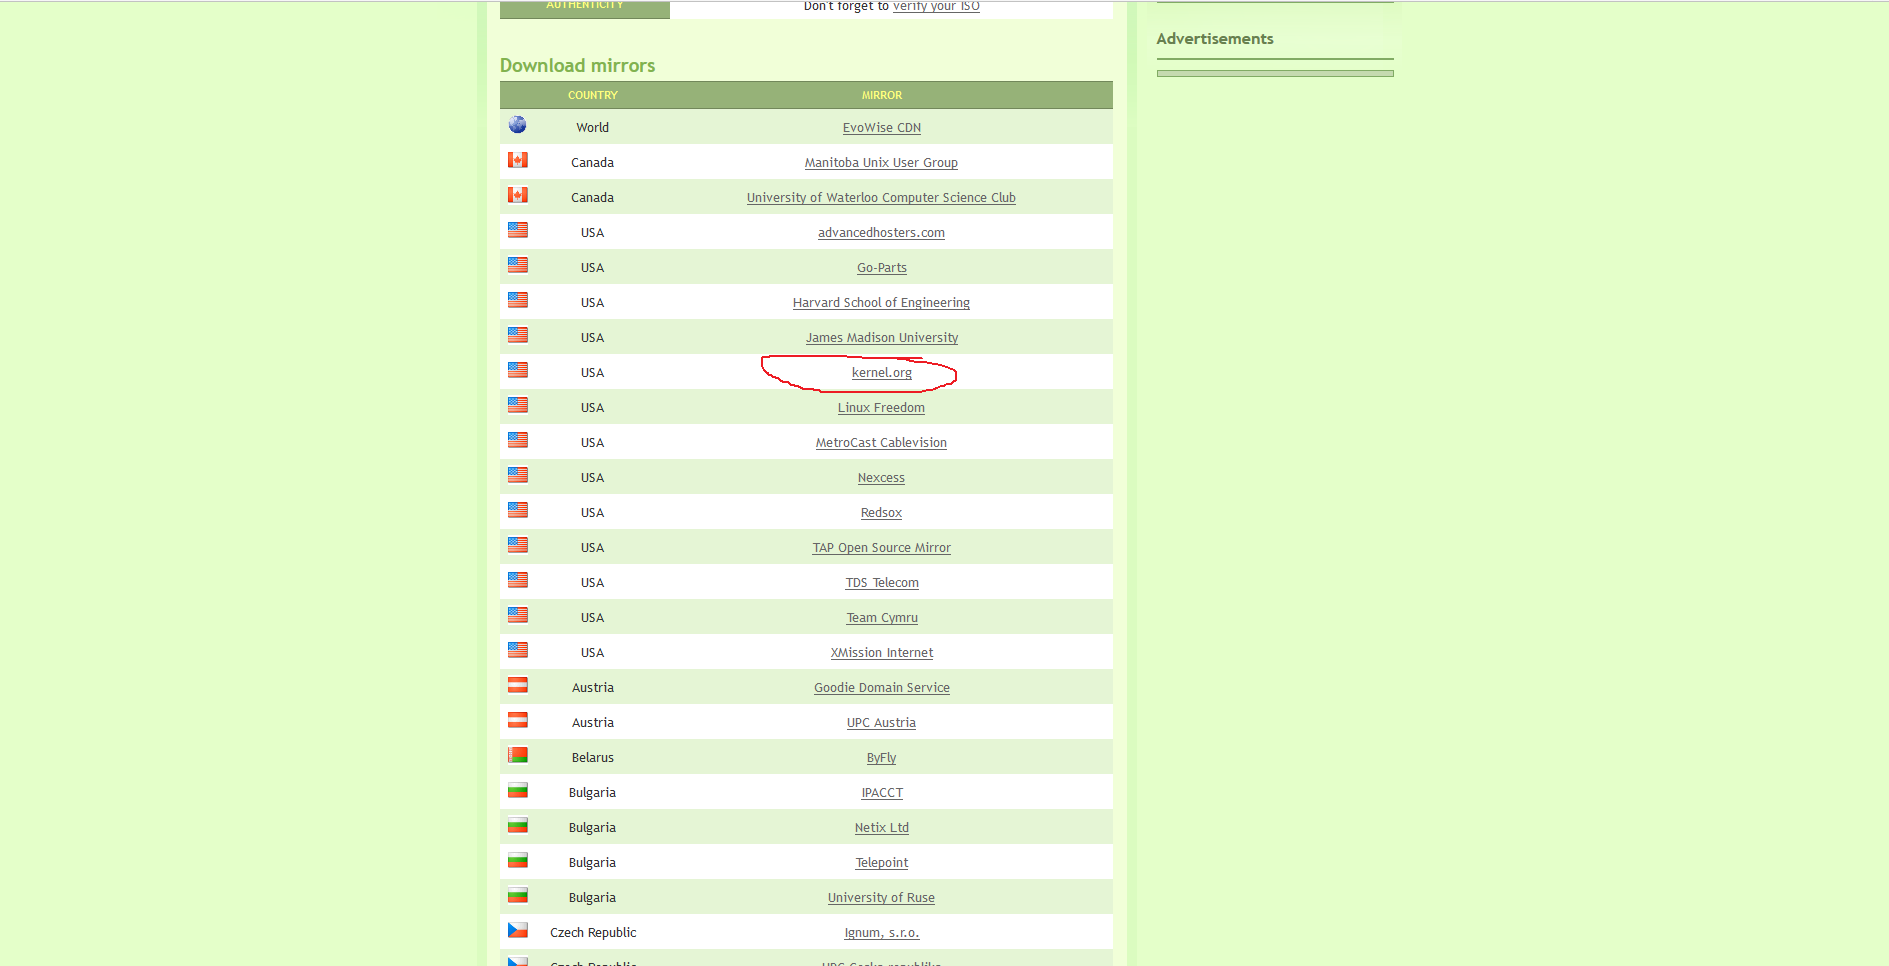
From there you will be taken to a page of various download locations. You are going to want to select a mirror that resembles a close location to where you are, such as by country.
I personally do not live in the USA but I find that the Kernel.org link always is nice and fast for me, faster than my local mirrors; so I tend to choose that one. The download will be the same regardless, so just pick whichever one makes your heart content.
Once you have your ISO file downloaded, you will need to make either a bootable DVD or a LiveUSB of the Linux Mint ISO. My personal recommendation is to make a LiveUSB as it will function considerably faster than a DVD, as well as many laptops today do not have CD/DVD drives.
To do this we will be using another piece of software called ‘Rufus’. There are many different tools out there similar to Rufus however I have personally had less issues and find Rufus to be the fastest.
You can download Rufus from https://rufus.akeo.ie/ and then scroll down until you find ‘Rufus 2.12 Portable’. We have no need to install Rufus to the hard drive at this time, so the portable version will do us just fine.
Once you have Rufus and the Linux Mint ISO downloaded, you’ll want to pop open Rufus.
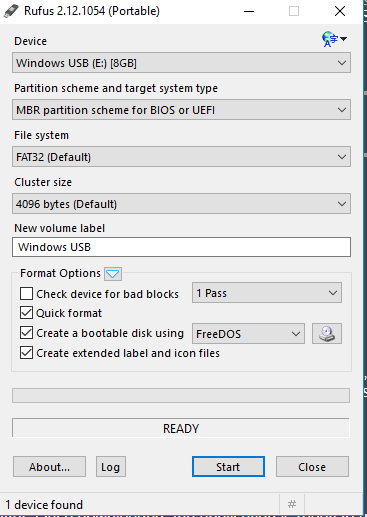
Upon opening Rufus it can look a little overwhelming with various options to select, however most of these actually are quite fine as their defaults. The only ones we are going to want to select are as follows:
-
DEVICE – Make sure that your USB stick is selected here
-
Partition scheme and target system type – MBR is usually fine, unless you have a hard disk that is over 2TB in size, or you specifically intend to use UEFI. If you have absolutely no idea what this means, stick with the default 'MBR' partition scheme for BIOS or UEFI’
-
File System – Leave as FAT32
-
Cluster Size – Leave as Default
-
New volume label – Lets name it ‘Linux Mint LiveUSB’
-
Leave all other options as per defaults and let’s click the small disc icon, navigate to where your Linux Mint ISO is, and select it.
-
Click Start – A warning will pop up notifying you that what you are about to do will erase everything on the USB Drive. This is normal and expected, your flash drive should be blank anyway (if it’s not, BACK UP YOUR STUFF OR IT WILL BE LOST FOREVER). Click Okay, and let Rufus do it’s thing.
Once Rufus has finished, the next step is to boot off your USB Drive and into the Linux Mint live environment; but what IS a live environment?
Linux Mint Live Environment
A Live environment or LiveUSB/LiveCD is a really neat feature that allows you to ‘try before you buy’ GNU/Linux. You can boot off the device (USB in our case) you have put your flavour of GNU/Linux onto, click around, install software, surf the web, and generally use as normal; without actually touching your computers Hard Drive.
The entire system will run off the USB stick, and when you reboot back to your main Hard Drive, your primary system is still there untouched, unless you chose to install the GNU/Linux system, as we will be doing.
In order to boot from your USB stick you are going to need to select the USB stick in your BIOS as your primary boot device. This part is the only part that you will need to figure out a little bit on your own, as without going through the steps of listing EVERY different BIOS in existence and the steps necessary; this tutorial can’t really guide you on how to do this. However, some basic pointers are:
-
Mash the DEL key on your keyboard upon doing a reboot of your machine, the second the power goes on. Typically this is the key that will take you into your systems BIOS. The key is listed usually during boot, it may also be F1 or another key.
-
You’ll want to navigate using the arrow keys of your keyboard through the BIOS, until you find something like ‘Boot Order’ or ‘Boot Devices’
-
You’ll then want to use the legend typically at the bottom of your screen, and adjust the boot order until your USB drive is the FIRST device in the list, or is the ‘Primary Device’ etc.
-
Once done, exit the BIOS (There is always a page somewhere that has the option to ‘save and exit’ the BIOS)
-
The Machine will reboot, hopefully into Linux Mint!
Assuming all was done successfully, you should see a screen like this:
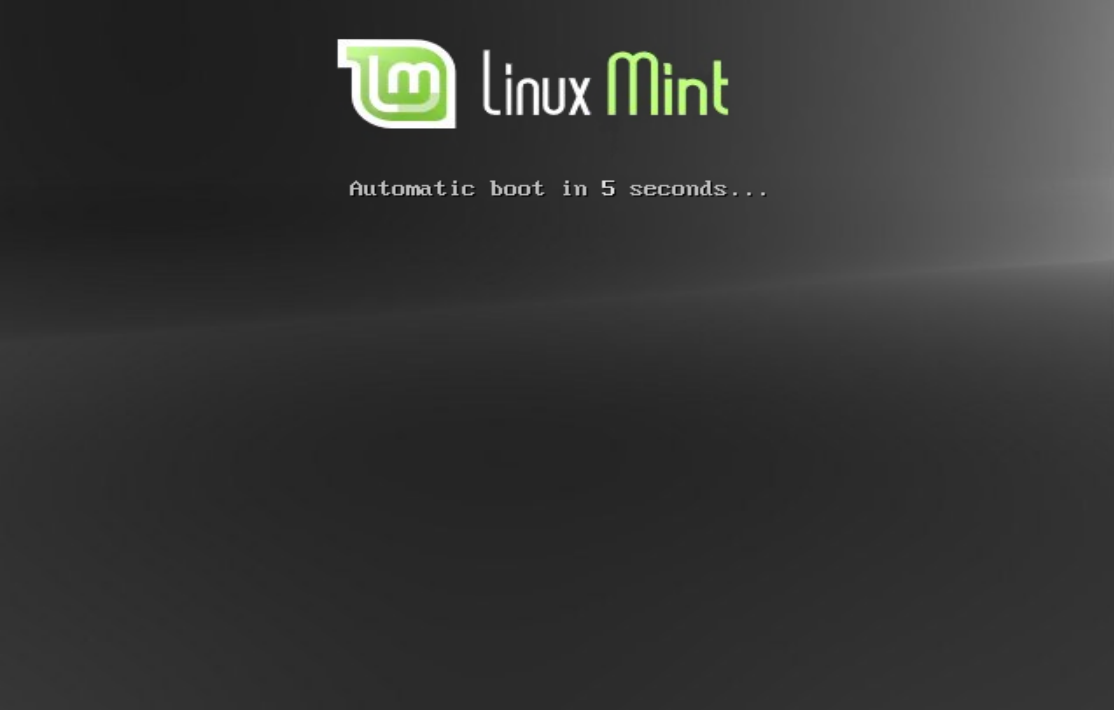
Just let the countdown do its own thing (or if you already hit a button, select “Start Linux Mint”) and you should in a short time, be taken to the Linux Mint MATE default desktop screen.
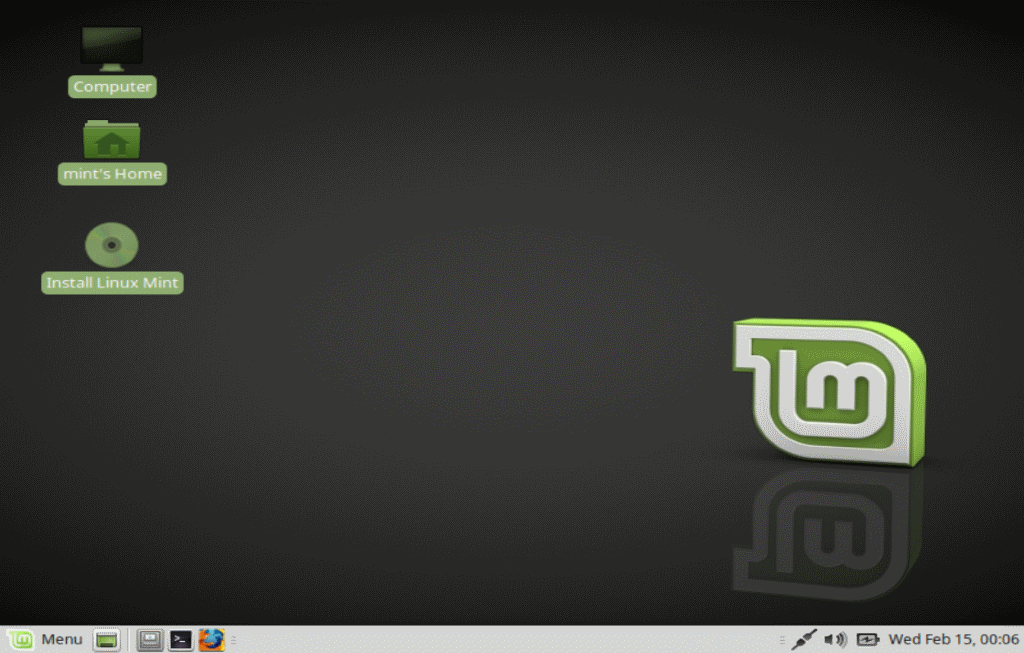
Now, feel free to click around until you get bored or you satisfy your curiosity, and then double click the “Install Linux Mint” desktop icon.
Next, make sure your language of choice is selected on the left side of the window that will pop up, and then select Continue.
The following screen is going to have a checkbox that says “Install third party software for graphics and Wi-Fi hardware,Flash,MP3 and other media,” you have two choices here: Select the box and have things installed for you automatically, or don’t. Most people are going to select this box, however there are some people who switch to GNU/Linux in order to avoid proprietary software altogether, and they may not wish to have closed-source software or plugins/codecs installed onto their machine; if this sounds like you, leave it unchecked, regardless when you have made your decision you’ll want to click Continue.
The following screen for the purpose of this tutorial will be very easy to navigate. You’re going to get multiple options available to you, such as Erasing the entire disk and installing Linux Mint, Installing Linux Mint alongside your current system (Like dual-booting Windows and Linux Mint together), Encrypting Linux Mint, Using LVM or doing your own partition setup.
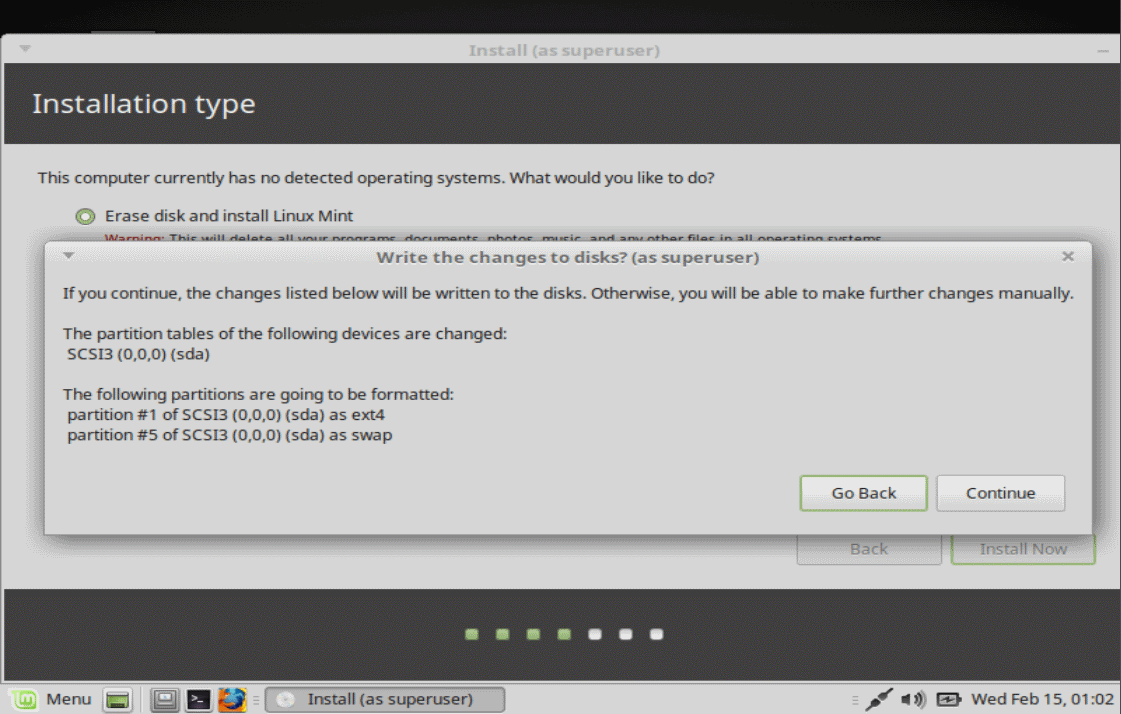
For this tutorial let’s select “Erase disk and install Linux Mint,” and then click “Install Now”.
Attention: This removes any data on the hard drive. Make sure you have backed up any data that you don't want to lose before you make that choice.

A window is then going to pop up, letting you know what the installer is about to do, such as erasing your old partitions, resizing them, making new ones for Linux Mint, so on and so forth. Unless you have specific needs for partition sizes, the default settings will be fine for the purposes of this tutorial. However, PLEASE BE AWARE: THIS IS YOUR LAST CHANCE TO MAKE SURE ANYTHING FROM YOUR WINDOWS MACHINE IS BACKED UP. IF YOU WANT TO SAVE ANYTHING, DO NOT CLICK ‘Continue’, DOING SO WILL ERASE EVERYTHING YOU HAD.
That being said, if you are all backed up and ready to go.....click Continue.
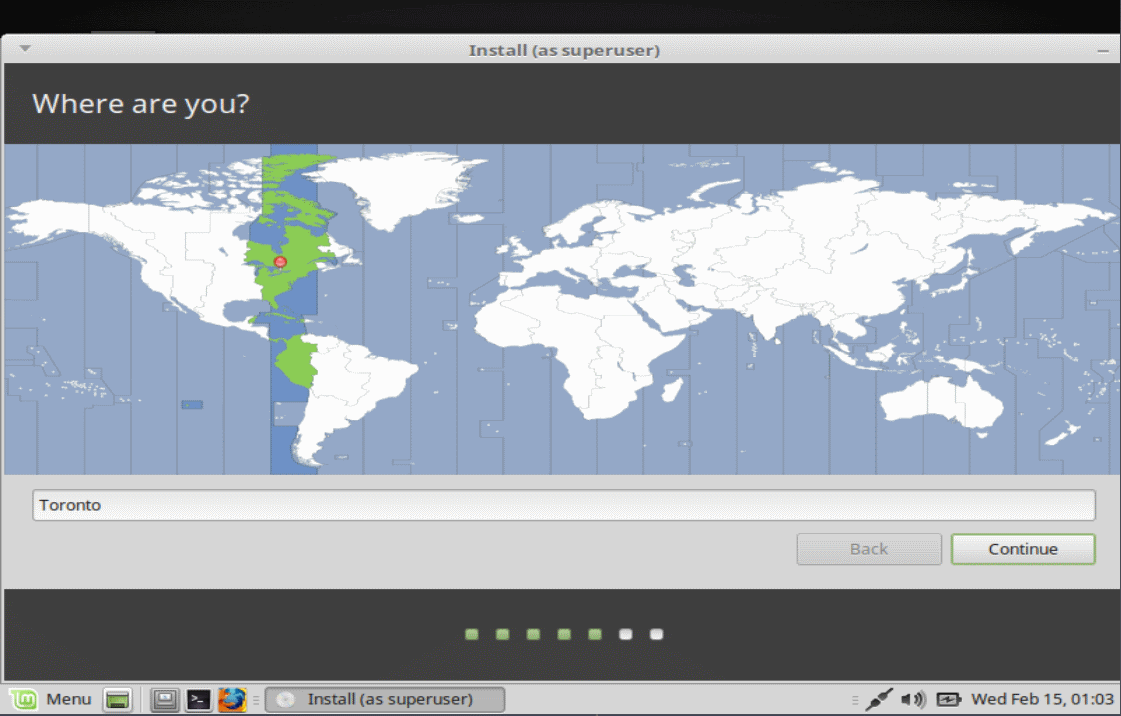
From here your system will now install Linux Mint. But the setup is not entirely done yet, we still have a few things to do while the system installs. The first screen you are going to see is going to ask you to select your location and timezone. You can click the map, or select your location from the drop-down boxes.
Then you will get a screen asking you to select your language and keyboard layout. Unless you use a different language or layout than most, leaving this as default is best.
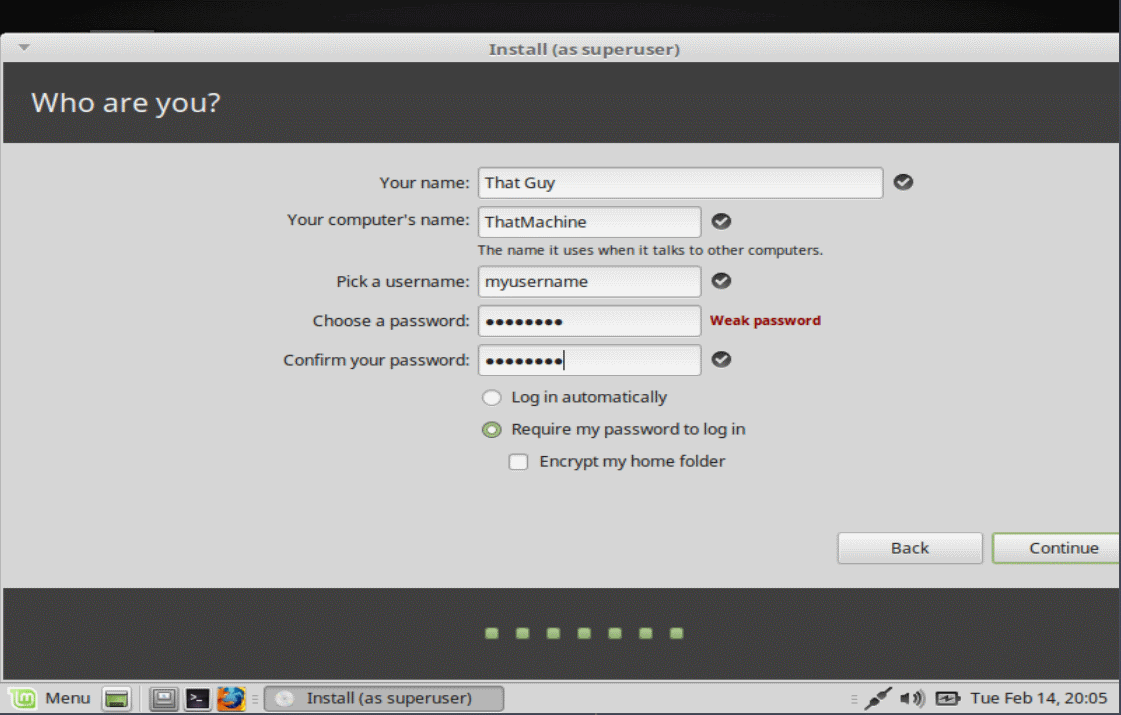
Following that will be a screen asking you for some details:
-
Your Name (John, Bob, Carol, Chris, etc)
-
Your Computer name (John’s Laptop, MachineODoom, etc)
-
Your username (Coolguy123, RagingDeathKill, etc)
-
Your password (DO NOT FORGET THIS, and YES, YOU NEED IT!)
-
Whether you want to Log in Automatically or whether a password is required (You STILL need a password even if you select automatic login!)
-
Whether you want to encrypt your home folder
GNU/Linux has a very different filesystem structure than Windows does. There is no C:/ Drive, there is no “Program Files” Folder etc, 99 percent of what you do, and save, will be kept in your ‘Home Folder.’
So, if you wish to keep your home folder protected from outsiders who may wish to access it, check this box. I highly recommend everyone encrypts their home folder, even if you didn’t select to encrypt your entire Linux Mint installation earlier in the tutorial. You will not notice this encryption happening, there is no noticeable performance hit, and it means that should your machine ever fall into the wrong hands, without your password, nobody can access your home folder. Even if they remove the hard drive, place it into another machine and attempt to access it; they will be unable. What reason is there NOT to encrypt?
Once all of that is done, click Continue.
Now you are going to be presented with a nice shiny slideshow showcasing some of the basic features of Linux Mint. Feel free to sit back and enjoy the show, go get a coffee/beer, and let the installation finish.
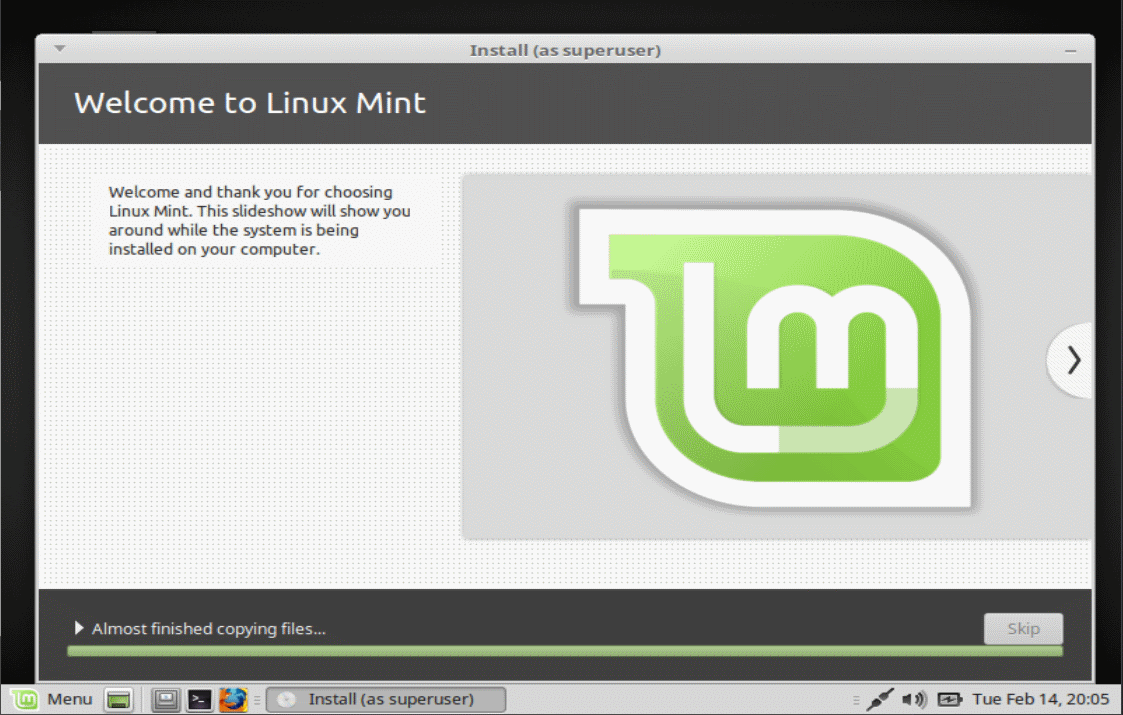
Once finished, you will be presented with a box asking if you wish to continue testing or reboot. Let’s get out of the LiveUSB and boot into our new Linux Mint System!
Once your machine has reboot you should be welcomed with a shiny new login screen (If you selected requiring password during the install), click your username, enter your password, then press enter to log in and reach your desktop.
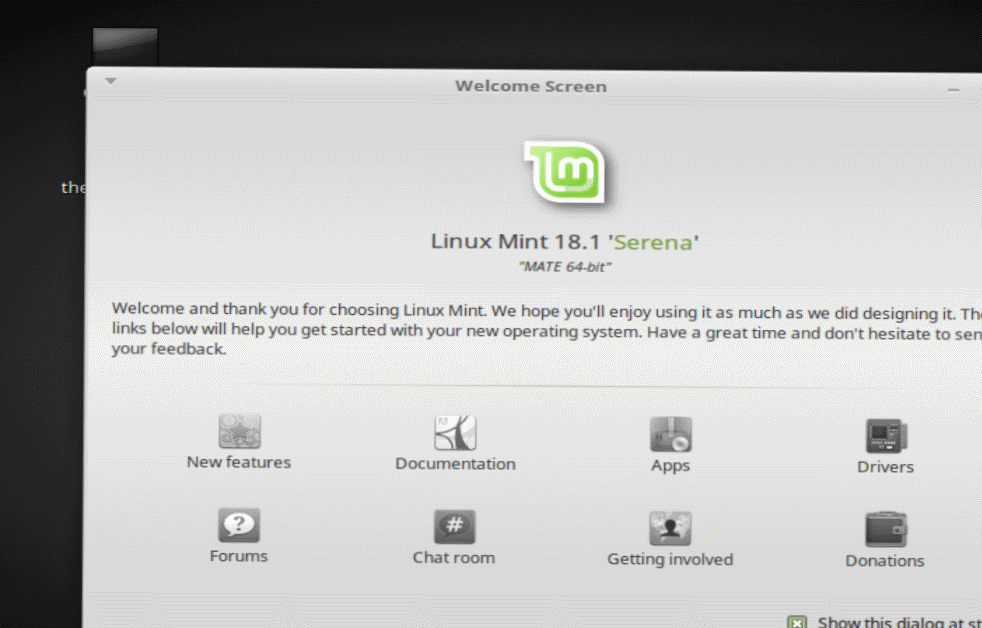
Upon reaching your desktop you will have a box pop up with the Linux Mint MATE welcome screen. On here will be various buttons for things like New Features, Documentation, Forums, Drivers, and Donations, as well as an option for you to uncheck/check a box to show the welcome screen on startup. Let’s leave that box checked for now and select “Drivers”.
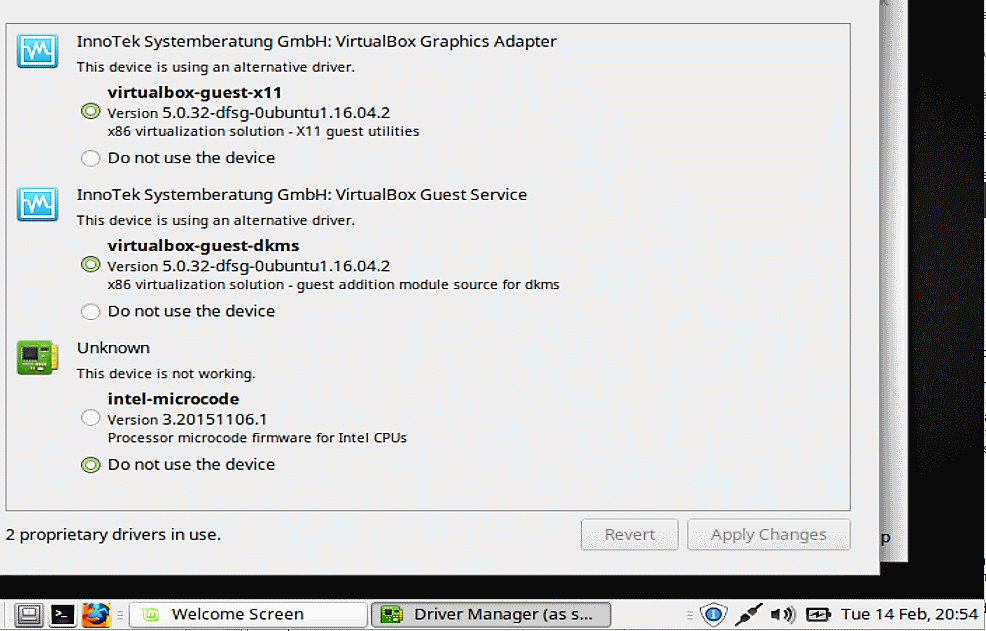
The first thing you are going to notice is that a box is going to pop up asking you for your password. This is normal, a security feature of GNU/Linux. Those of you familiar with Mac OS X will be familiar with this way of doing things as well; or those of you running Windows who did not disable UAC.
Anytime you do anything on a system level, requiring elevated privileges, you will be asked for your password; in order to help prevent hackers or bugs from doing anything that shouldn’t be done. Enter your password, and the Driver Manager will pop up.
Updates
Now, depending on your hardware you may be given some options here. Things like GPU drivers, CPU microcode firmware and such may all be potential options, or you may simply have no options pop up. You will need to make an executive decision about what to install or not install. If you are a gamer and wish to play games requiring heavy 3D acceleration using an NVIDIA GPU for an example, using the open source driver that is installed by default may not be enough, so you’ll want to select the NVIDIA Driver listed as an option.
I myself on the machine installed, only had the option of installing proprietary firmware for my Intel CPU. I’ve attached a photo to show you what that looks like. Select the driver(s) you wish to use, then select Apply Changes, and enter your password if requested.
Once that is done, it may tell you depending on your choices that a system reboot is necessary. Hold off on that for the time being, as we are going to update our system as a whole first, and then we will do a reboot anyways.
After you have done everything involving drivers, it’s time to update our system, as even though we are running the latest version of Linux Mint, packages are updated sometimes multiple times a day, and it’s always good to keep our system running the latest software. In the bottom right corner of your screen beside your clock, will be an icon of a shield with a blue circle and the letter ‘i’ inside of it. If you click on that, a window will pop up asking you to set an update policy.
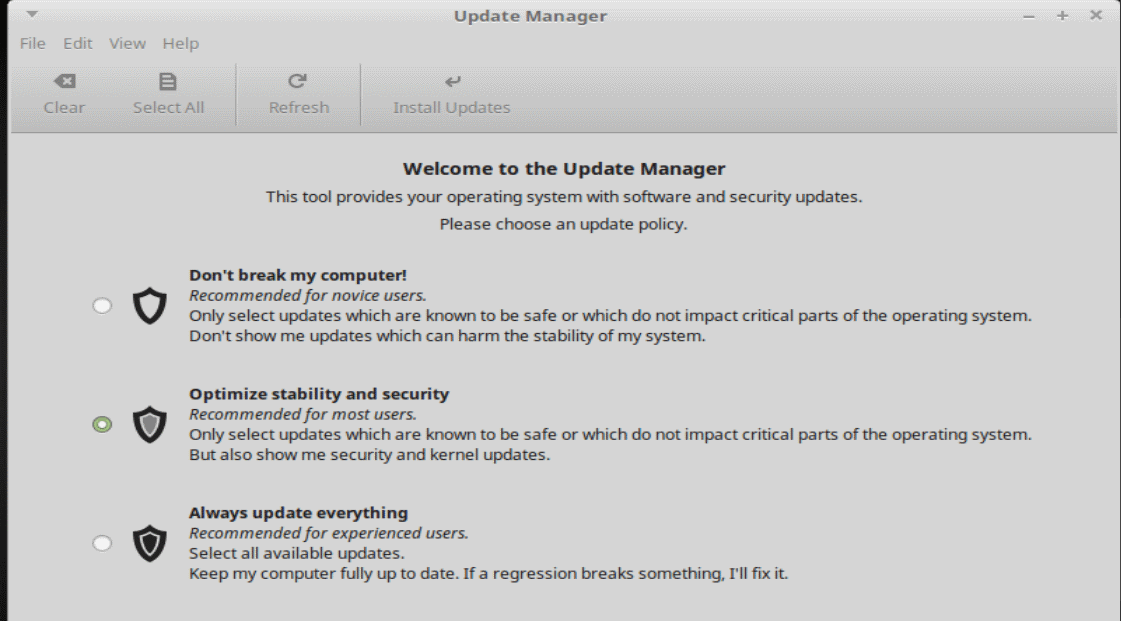
The average user is going to either want to select the first or the second option; option three should only be selected by users who are comfortable and experienced with Linux.
Read the details given about each option, and make your choice of either option one or two; I personally recommend option two, as you still are only given updates that will not impact critical parts of the system and potentially break something if a conflict happens with another package, but you will also get security and kernel updates as well which are crucial to anyone using their machine on the internet.
The only real reason I can see using the first option is if you have no intention of ever installing new software, visiting websites on the internet beyond your email or extremely basic web searches, or the machine is only ever going to be used for super simplistic tasks. Your grandmother might want to choose option one, but otherwise; go with option two, and then select ‘OK’
At this point the Update Manager is going to pop up, and show you updates that are available. Simply click “Install Updates”, enter your password, and the Update Manager will handle the rest for you. Once that is done the first time, it’s going to show you more updates. The reason for this, is the software updated itself first, and once the Update Manager itself was updated, then it can show you the latest packages your system needs. Again, click ‘Install Updates’ and let the system do its thing.
Once that is finished, let’s reboot the system. Click the ‘Menu’ button in the bottom left corner of your screen, select ‘Quit’ and then ‘Restart’ to restart the system. Assuming that everything goes as it should your system should reboot normally, take you back to the login screen if you have one, and then bring you back to the desktop again.
Installing Software
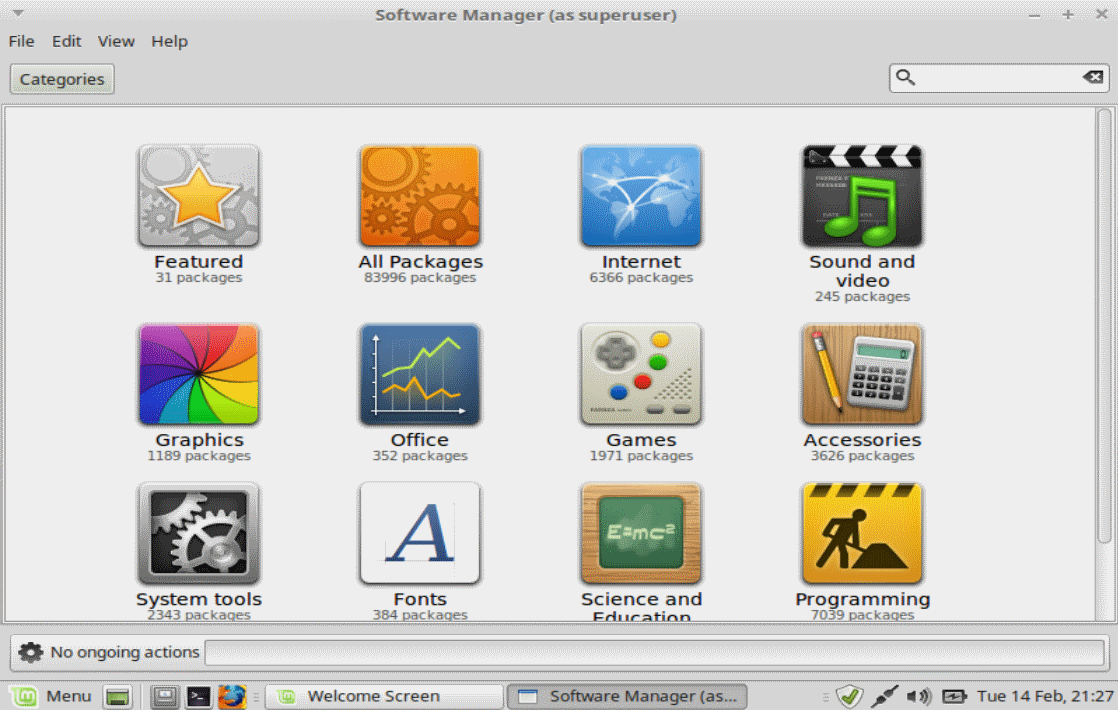
The last part of this tutorial is getting some programs! On your welcome screen (because you kept it as showing up, right?) select “Apps”, enter your password, and then you will be taken to the ‘Software Manager’. This is where you will get the vast majority of programs you ever use, until you start dealing with outside repositories, installing software via terminal etc.
For now, let’s install something simple; Banshee, a music player. We already have one installed called Rhythmbox, but I prefer Banshee. We could simply search for Banshee within the Software Manager, but let’s explore a little and find it. Looking at the main screen you will see a variety of categories, let’s select ‘Sound and Video’, which will then show us a big list of software.
Once inside the Sound and Video category, scroll down until you find Banshee and double click it. This will take you to a page with screenshots and information about the program. Simply click ‘Install’ and the program will automatically take care of downloading and installing Banshee for you. Once that is done, click your Menu in the bottom corner, then click ‘All Applications’ in the top right corner, navigate with your mouse to ‘Sound and Video’ and you will find our brand new shiny Banshee listed. Installing a vast array of software is literally that simple. Explore the various software that is already installed, and if you can’t find a type of software that you’d like to have, browse the Software Manager and install something for it!
That’s it for the basic installation of Linux Mint 18.1 MATE. There is a lot more that can be done that will be covered in more tutorials in the future, but this should be enough to get you started into the wonderful world of GNU/Linux.
More information can be found at the following sites, for installing software, drivers, and other things we touched on during this tutorial! Another thing to keep in mind, is that because Linux Mint 18.1 is based off Ubuntu 16.04, if you ever run into trouble and can’t find answers on the Linux Mint website, do a web search for your problem with the keywords Ubuntu 16.04, and the fix for it if one exists, should be fully compatible with your Linux Mint system!
https://www.linuxmint.com/documentation/user-guide/MATE/english_17.3.pdf
https://www.linuxmint.com/documentation.php
Enjoy your new Linux Mint system!
This article was first seen on ComTek's "TekBits" Technology News

- Log in to post comments