Configure Windows Defender Network protection in Windows 10
Network Protection is a new security feature of Windows Defender that Microsoft introduced in the Fall Creators Update for its Windows 10 operating system.
It extends Windows Defender SmartScreen by blocking outbound (HTTP and HTTPS) traffic connecting to resources that have a low reputation.
The feature is part of Windows Defender Exploit Guard, and it requires that Windows Defender is turned on, and that the security program's real-time protection feature is enabled as well.
Tip: check out our previews guides on Controlled Folder Access, Exploit Protection and Attack Surface Reduction for a complete overview of the new security features.
Windows Defender Network protection
System administrators and users may configure the Network protection feature of Windows Defender using policies, PowerShell or MDM CSPs.
Group Policy
You can use the Group Policy to enable the Network protection feature on Windows 10 Fall Creators Update (or newer) PCs.
Note: The Group Policy Editor is not available on Home editions of Windows 10.
- Tap on the Windows-key, type gpedit.msc and hit the Enter-key to load the Group Policy Editor.
- Navigate to Computer Configuration > Administrative Templates > Windows components > Windows Defender Antivirus > Windows Defender Exploit Guard > Network protection.
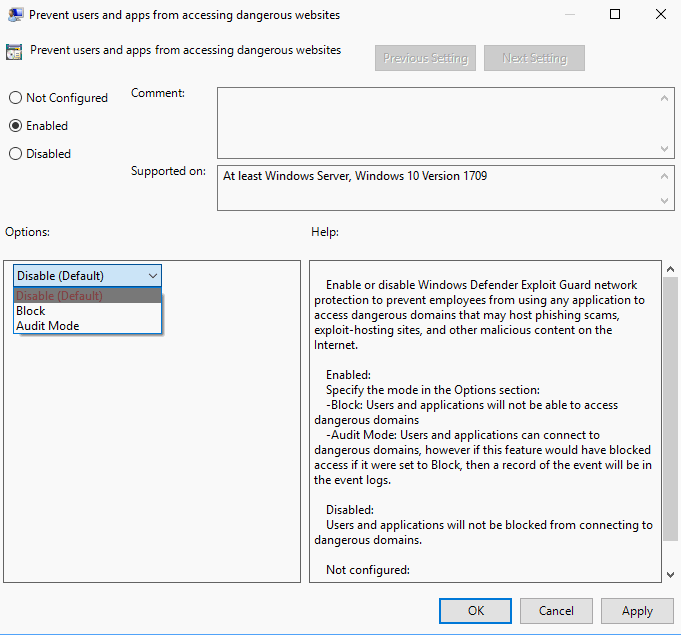
- Load "Prevent users and apps from accessing dangerous websites" with a double-click.
-
Set the policy to enabled, and assign it one of the available modes:
- Block -- Malicious IP addresses and domains are blocked.
- Disabled (default) -- The feature is not active.
- Audit Mode -- This records blocked events but won't block the events.
Using PowerShell
You may use the PowerShell instead to manage the Network protection feature. The following commands are available:
- Set-MpPreference -EnableNetworkProtection Enabled
- Set-MpPreference -EnableNetworkProtection AuditMode
- Set-MpPreference -EnableNetworkProtection Disabled
You need to open an elevated PowerShell prompt to run these commands:
- Tap on the Windows-key, type PowerShell, hold down the Shift-key and the Ctrl-key, and select PowerShell from the results to open a PowerShell interface with administrative privileges.
Network protection events
Events are recorded when the feature is enabled. Microsoft published a resource package that includes custom views for Event Viewer to make things easier for administrators.
- Download the Exploit Guard Evaluation Package from Microsoft.
- Extract the package to the local system.
- It contains custom XML views for all Exploit Guard events. You need the file np-events.xml for the custom network protection event view.
- Tap on the Windows-key, type Event Viewer, and select the entry that is returned by search.
- Select Action > Import Custom View.
- Load np-events.xml and select ok to add the view to the Event Viewer.
The following events are written to the log when the security feature is enabled on Windows 10 machines:
- Event 1125 -- Audit-mode events.
- Event 1126 -- Block-mode events.
- Event 5007 -- Settings modification events
Resources
- Protect your network with Windows Defender Exploit Guard
- Evaluate Network protection
- Enable Network protection
- Windows Defender Exploit Guard
- Set-MpPreference documentation
- Add-MpPreference documentation
- Get-MpPreference documentation
This article was first seen on ComTek's "TekBits" Technology News

- Log in to post comments